

A greasy kitchen exhaust fan is not just ugly but it slows air movement, disperses odors and might cause overload to the motor in the long run. It is very important to learn the correct method of exhaust fan cleaning in a kitchen setup to keep your cooking area cleaner, safer, and save more energy.
This guide gives an explanation on how to clean removable and fixed exhaust fans, frequency of cleaning them, and how to avoid heavy accumulation of grease without duplicating any form of article and text.
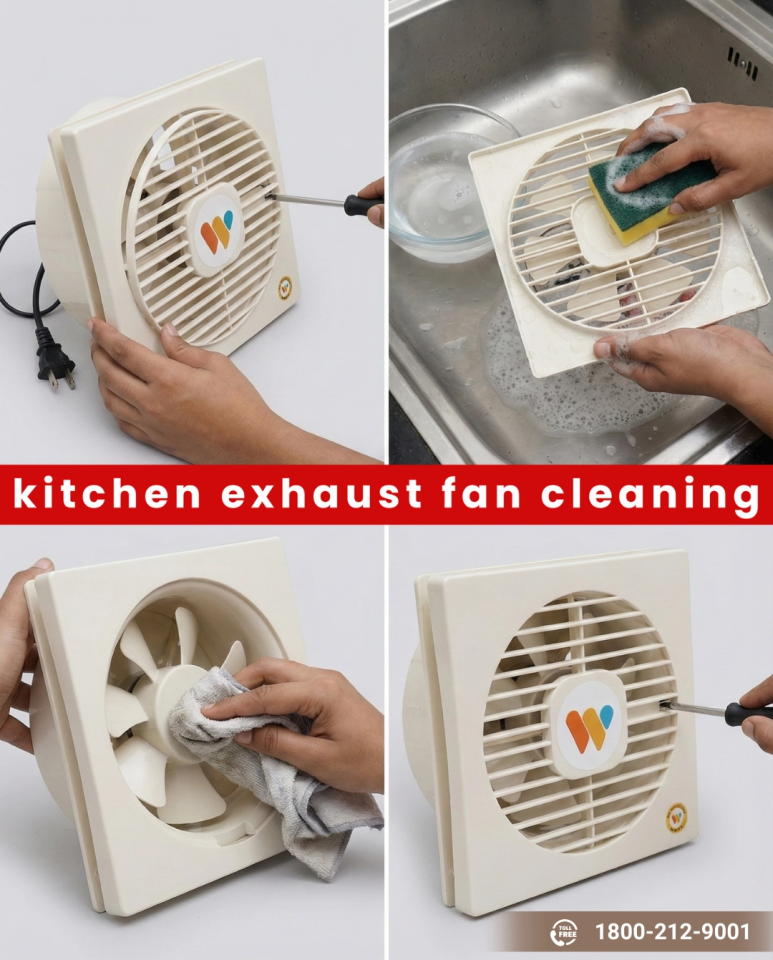
In cleaning a kitchen exhaust fan, the power should be switched off, the front mesh or cover removed and dust removed. Wet the mesh and detachable blades in a hot water and dishwasher soap mixture, scrub grease, wipe down the motor casing with a wet towel (but never wet it) and then completely dry everything and then assemble the fan back together.
In the fans that you are unable to disassemble, clean there: vacuum or dust, spray a safe de-greaser or vinegar solution on a cloth, clean the blades and the casing with the help of the cloth and allow the fan to dry completely before turning it on again.
Other than these periods, have kitchen exhaust fan cleaning done when you observe sticky dust attached on the mesh, a change in noise or when you see grease strands hanging visibly on the blades.
You have not to await a whole program; your fan so frequently informs you that you should take care of it:
The appearance of at least two of these indicators indicates that the time to clean the exhaust fan kitchen surfaces is already available.
Before you start clean exhaust fan kitchen attention should be paid to safety:
These are small steps which help to drastically reduce the risk of electric shock and damage during cleaning of the exhaust fans.
In order to clean exhaust fan kitchen efficiently, it is good to have the following items handy:
Both natural and commercial variants cleaners can be effective.
A realistic solution: Use natural cleaners for monthly wipe-downs and use commercial degreasers to use once in a year on deep cleaning.
When your fan has a removable mesh and blades follow the below steps
Step 1: Switch off the fan and plug out the switch.
Step 2: Take off the Front Mesh/cover.
Step 3: Hold the blade hub and undo the nut or clip at the spot where the blades attach onto the shaft and slide the blades off.
Step 4: Put hot water into a bucket or a sink, 1-2 teaspoons of dish soap and 1-2 teaspoons of baking soda. Wet the mesh and the blades within 15-30 minutes.
Step 5: Scrub the mesh and blades using a soft brush or sponge taking care of corners and joints.
Step 6: Wipe the inside and the surrounding wall with a piece of microfiber cloth dipped in the same solution and wiped.
Step 7: Wash the blades and the mesh using clean water and dry them up with a dry cloth. Let them dry naturally within 1-2 hours and then thereafter it is safe to assemble again.
Step 8: Install the blades again, screw on the nut and then fix the front mesh in place.
There are also fans that are fixed or installed that are so tight that a homeowner cannot take out the motor assembly. Nevertheless, you can still manage to effectively clean up kitchen exhaust fans in place in such situations.
Step 1: Power Off: It is a common step while cleaning of an exhaust fan, disconnect or break off power beforehand.
Step 2: Clean and wash the cover, it is best to remove the front mesh/cover without damaging it as much as possible and vacuum/wipe it as well.
Step 3: Vacuum the casing and fan, pull with a crevice or a brush attachment to remove loose dust on the blades and cavity Avoid being rough around wiring and open terminals.
Step 4: Spray a piece of cloth with vinegar-water or a weak degreasing solution, but do not spray the fan itself, and wipe the surfaces of the blades and inside frame.
Step 5: Keep on wiping using dry microfiber cloth till no water is left.
Attach the dry mesh/cover with a clip or a screw on the back of the dry mesh, turn the power on and operate the fan for a few minutes to make sure everything is running smoothly.
These are some of the most frequent mistakes that can be made to reduce the life of the fans and cause safety problems:
Such errors may break bearings or lead to rust or even run a fire risk in case of moisture penetrating into the electrical part.
To minimize grease, build up on exhaust adjust a few habits:
The practices ensure every exhaust fan cleaning process is done faster and simpler.
Having a clean kitchen exhaust fan is not a mere cosmetic issue; it has a direct impact on the quality of the air in the room, safety and the overall health of the space where you cook. Knowing how to clean up exhaust fan in the kitchen step by step, i.e. whether the blades can be removed or not, will save you grease accumulation, decrease the odors, and make the motor work efficiently throughout years.
Ans: Every 2–3 months, or every 4–6 weeks if you cook oily or spicy foods regularly.
Ans: Yes, mild household cleaners work, for tough grease use commercial degreaser.
Ans: Reduced airflow, loud noise, sticky blades, visible grease, and cooking smells.
Ans: Spray degreaser, let it sit, scrub gently with a brush, and wipe clean.
Ans: It should pull air quickly, run quietly, and leave no lingering odors after cooking.